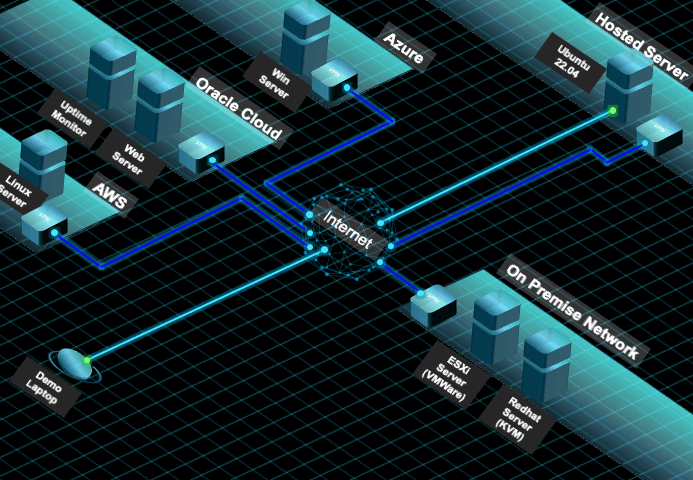
Labs are great for testing, development and demo. In this tutorial I am going to show you how I setup my lab in 2025.
- Basic Setup and Configure the Ubuntu Hosted Server (SSH should have been enabled)
Key steps
- Update the Ubuntu Server with the latest update.
- Change the password.
- Change the hostname.
- Add a new sudo enabled user.
- Enable (Install) a Linux Firewall. For my lab I am using nftables.
- Configure the Firewall to restrict access.
- Install a Desktop Environment For my lab I am using a lightweight xfce.
- Install Remote Destkop Management. For my lab I am using xrdp.
- Install and enable virtualization (KVM).
- Setup the virtual environment network.
Optional steps
- Bash and Bash Prompt
- Logging and Log rotation
- Make sure the Ubuntu Server is update to the latest version.
sudo apt update && apt upgrade- Change the password. Always a good practice to change the default password if that is assign to you.
# To change the current user passwd
passwd

# In root prompt to change a user password
passwd <user>
passwd demo
Most of the hosted linux server uses ssh for management. So it is a good practice to try and protect the ssh access. Install a Linux Firewall. In this tutorial we will use nftables, even thou by default ufw is install in the Ubuntu Server.
- Change the hostname. Always good to have a proper naming if you are managing multiple servers.
hostnamectl set-hostname new-hostname- Add a new sudo enabled user.
# Add a user adduser <username>
sudo adduser demo2
Adding user `demo2' ...
Adding new group `demo2' (1002) ...
Adding new user `demo2' (1002) with group `demo2' ...
Creating home directory `/home/demo2' ...
Copying files from `/etc/skel' ...
New password:
Retype new password:
passwd: password updated successfully
Changing the user information for demo2
Enter the new value, or press ENTER for the default
        Full Name []: demo2
        Room Number []: demo2
        Work Phone []: demo2
        Home Phone []: demo2
        Other []: demo2
Is the information correct? [Y/n] y

# Add user to sudoers group
sudo usermod -a -G sudo demo2

or

sudo adduser demo2 sudo

# To delete the user from sudoer group without deleting the user
sudo deluser demo2 sudo
Removing user `demo2' from group `sudo' ...
Done.
To configure the sudoers file check out this article.
- Enable (Install) a Linux Firewall. For my lab I am using nftables. This is the basic rule for nftables. You can build on this ruleset for more advance rules.
# Check the version of nftables
nft --version

# If nft command is not available then you need to install nftables
sudo apt install nftables- Configure the Firewall to restrict access. The default nftables config file is located here /etc/nftables.conf
# Ensure you configure access to prevent ACCIDENTALLY LOCKING your access in the INPUT chain.
# Accept traffic from localhost
sudo nft add rule inet filter input iif "lo" accept

# Accept established and related connection
sudo nft add rule inet filter input ct state established,related accept

# Accept ssh connection to the Ubuntu server (Port 22 is the default port
# If you have change SSH port remember to change the dport number
sudo nft add rule inet filter input tcp dport 22 accept

# Add any other rules that you need to access the server
# Once you have configure the necessary access, you can now configure the drop rules
# drop all other traffic. Always ensure the drop rule is at the end of your rule list.

sudo nft add rule inet filter input drop

# Start the nftables service and enable it upon reboot.
sudo systemctl status enable nftables.service
sudo systemctl start nftables.service

Unit start.service could not be found.
● nftables.service - nftables
     Loaded: loaded (/lib/systemd/system/nftables.service; enabled; vendor preset: enabled)
     Active: active (exited) since Sun 2025-02-09 02:59:53 CET; 52min ago
       Docs: man:nft(8)
             http://wiki.nftables.org
   Main PID: 19439 (code=exited, status=0/SUCCESS)
        CPU: 16ms

Feb 09 02:59:53 dracocybersecurity.com systemd[1]: Starting nftables...
Feb 09 02:59:53 dracocybersecurity.com systemd[1]: Finished nftables.
# To ensure the rules are save and apply upon reboot.
# You can manually add the rules to /etc/nftables.conf or
# save the rule for the current list to the config file use the following command. This command will overwrite the previous ruleset.
sudo nft list ruleset > /etc/nftables.conf# The configuration in the file should look like the following
table inet filter {
chain input {
type filter hook input priority filter; policy accept;
iif "lo" accept
ct state established,related accept
tcp dport 22 accept
drop
}
chain forward {
type filter hook forward priority filter; policy drop;
}
chain output {
type filter hook output priority filter; policy accept;
}
}
- Install a Desktop Environment For my lab I am using a lightweight xfce.
# Install the xfce lightweight desktop and the necessary utilities.

sudo apt install xfce4 xfce4-goodies xorg dbus-x11 x11-xserver-utils- Install Remote Destkop Management. For my lab I am using xrdp.
sudo apt install xrdp
sudo apt enable xrdp- Install and enable virtualization (KVM). Install all the KVM software, utilities and Virtual Manager
clear
sudo apt install -y qemu-kvm virt-manager libvirt-daemon-system virtinst libvirt-clients bridge-utils- Setup the virtual environment network to allow bridge mode. By default the virtual network enabled in KVM is in “nat” mode. If you are using Ubuntu version 22.04. You should be able to use netplan for the network configuration
Edit your Netplan config (/etc/netplan/01-netcfg.yaml):
# If you have gotten additional public address for your hosted environment you might want to enable bridge mode to allow direct access to the Service provider network.

# Modify the Netplan to add a bridge to use in the virtual network.
sudo nano /etc/netplan/01-netcfg.yaml
network:
  version: 2
  renderer: networkd
  ethernets:
    ens18:
      match:
        macaddress: ac:1f:6b:69:c2:08
      set-name: eth0
      dhcp4: no
      dhcp6: no

# add the bridge configuration here
  bridges:
    demobridge01:
      interfaces: [ens18]
      addresses:
        # Enter the ip assign to you here.
        - 111.111.222.222/24
        #- 2a02:c111:1111:1111:0000:0000:0000:0001/64
      #gateway6: fe80::1
      routes:
        - to: 0.0.0.0/0
          # Enter the ip assign to you here.
          via: 111.111.222.1
          on-link: true
      nameservers:
        search: [ invalid ]
        addresses:
          - 213.136.95.11
          - 213.136.95.10
          #- 2a02:c207::2:53
          #- 2a02:c207::1:53

# Generate the netplan
sudo netplan generate

# Test the netplan configuration
sudo netplan try

# Once you validate that there is no error.

sudo netplan apply
Validate the configuration
sudo ip addr

sudo ip link show eth0
Defining the bridge in KVM virtual network
# If you have gotten additional public address for your hosted environment you might want to enable bridge mode to allow direct access to the Service provider network.

# Modify the Netplan to add a bridge to use in the virtual network.

#1. create a bridge template

sudo nano /tmp/demobridge.xml
<network>
    <name>demobridge</name>
    <forward mode="bridge"/>
    <bridge name="demobridge01"/>
</network>

sudo virsh net-define /tmp/demobridge.xml

sudo virsh net-autostart demobridge

sudo virsh net-list –all