High Availability (HA) is a Active-Passive (Standby) setup that provide high availability for the LAN users. It is a useful setup for customer who wants to ensure that if one device fails the other device will take over while waiting for the faulty unit to be replaced. This help to ensure minimum downtime.
Below is how the setup looks like. Where we will be configuring 2 x FTDv10 with failover and state link configured.

Do take note that the 2 devices must be identical connected over a failover link for HA to works. Whether it is physical device or a virtual device. The standby unit does not actively pass traffic, but synchronizes configuration and other state information from the active device.
Optionally you can also add a state link to pass the connection information to the standby device to preserve the user connections in the event failover occurs.
Please do read the official documents for more detailed recommendation especially if you are configuring for production environment.
The step up is broken into 6 parts for this tutorial.
Part 1 – Prepare the Two Units for High Availability
Part 2 – Configure the Primary Unit for High Availability
Part 3 – Configure the Secondary Unit for High Availability
Part 4 – Configure Failover Criteria for Health Monitoring
Part 5 – Configure Standby IP and MAC Addresses
Part 6 Verify the High Availability Configuration
Part 1 – Prepare the Two FTD/FTDv Units for High Availability
- Check the documentation to ensure that the devices meet the minimum requirements.
The devices should be the same model, version and have matching number of ports (Make sure you enable the same number of ports for Virtual Appliances.) - For this tutorial we will be using the same port and virtual switch for Failover Links and Stateful Failover links.
- Ensure that the ports matches on both the active and standby FTDv. Configure the IP address to avoid conflicts before configuring the HA.
- Ensure that ports are connected to the right switch/virtual bridge.
Part 2 – Configure the Primary Unit for High Availability
Once you finish the initial wizard configuration of the FDM, we can proceed to the actual HA configuration. If you are planning to use a different subnet from the default network you might want to change that first. (Also take note that you should delete the DHCP scope on the Secondary (Standby) device.
- Click on Device

- Click on Configure next to High Availability

- Choose the Primary Device (Active)

- Configure the Failover Link properties. You can choose to configure the Failover Link on a separate interface from the Stateful Failover Link or like my example using the same Link for both.
(Optional) Enter an IPsec Encryption Key

- You can copy the configuration of the Failover and Stateful Failover Link to the clipboard to apply to the Secondary Device (Standby) later.

- Click Activate HA

After you completes activating the HAT, there is a quick guide to show you the next step depending on whether you need to configure the secondary device or you have done both.

Part 3 – Configure the Secondary Unit for High Availability
- Click on Device
- Click on Configure next to High Availability

- Choose the Secondary Device (Standby)

- You can configure the Failover Link and Stateful Failover Link properties manually or Paste from the Primary Device that is store in the Clipboard


Ensure you select the use the same interface as the Failover Link and Enter the IPSec Encryption Key. The same as the Primary Device in this tutor

- Click Activate HA
Once the configuration is done wait for approx. 5 – 10 mins and you should see the status changed to Primary Device Active and Peer Syncing

If the configuration is done correctly you should see Peer change to Standby with the importing/synchronizing icon running.

It takes a while for the configuration to sync between the primary and secondary devices. If you see the following screen on the Secondary Device it is normal as the configuration is being imported from the primary device.


If everything completes successfully you should see the icon changed to a pair of directional arrows.

Part 4 – Configure Failover Criteria for Health Monitoring
The units in a high availability configuration monitor
- Devices overall health
You can configure the poll time to check the interface and peer and also the interval (hold time) between checks. in the High Availability > Failover Criteria Section

- Interface health. You can keep the default values or change the failover times base on the failover criteria.
Determine the interface that you want to monitor by going to the Device > Interfaces > View All Interfaces, and choose the interface that you want to monitor.


In the interface under the Advanced tab select Enable for HA Monitoring.
Part 5 – Configure Standby IP and MAC Addresses (This is not mandatory but it is a recommendation to configure)
When you configure your interfaces, you can specify an active IP address and a standby IP address on the same network. Although recommended, the standby address is not required. Without a standby IP address, the active unit cannot perform network tests to check the standby interface health; it can only track the link state. You also cannot connect to the standby unit on that interface for management purposes.
- Choose Device > Interfaces.
- Click the edit icon for the interface whose standby addresses you want to configure.

- Configure the Standby IP addresses.

- Click on Advance Options tab and configure the MAC addresses.
check the section for recommended Virtual Local MAC addresses.

- Click on OK when done.
Do the following for all the interfaces that you want to monitor for HA.
Part 6 Verify the High Availability Configuration
There are a few simple steps that you can execute to verify if the HA works.
- Initiate a FTP session to see if the failover kicks in properly.
- issue the command no failover active on the active unit to simulate the active unit going into standby and the standby unit taking over as active.
- You should see that the FTP traffic will continue its download while the FTDv failover from the Primary (Active) Device to the Secondary (Standby) Device.
Additional Tips and Resources
Initial Wizard Setup (CLI) Configuring Management IP Address.
System initialization in progress.  Please stand by.
For system security, you must change the admin password before configuring this device.

Password must meet the following criteria:
- At least 8 characters
- At least 1 lower case letter
- At least 1 upper case letter
- At least 1 digit
- At least 1 special character such as @#*-_+!
- No more than 2 sequentially repeated characters
- Not based on a simple character sequence or a string in password cracking dictionary

Enter new password:
Confirm new password:

 Password successfully changed for the admin user.

You must configure the network to continue.
Configure at least one of IPv4 or IPv6 unless managing via data interfaces.
Do you want to configure IPv4? (y/n) [y]: y
Do you want to configure IPv6? (y/n) [n]: n
Configure IPv4 via DHCP or manually? (dhcp/manual) [manual]: manual
Enter an IPv4 address for the management interface [192.168.45.45]: 172.16.2.45
Enter an IPv4 netmask for the management interface [255.255.255.0]: 255.255.255.0
Enter the IPv4 default gateway for the management interface [192.168.45.1]: 172.16.2.2
Enter a fully qualified hostname for this system [firepower]: FTDv7-3-0-Active
Enter a comma-separated list of DNS servers or 'none' [208.67.222.222,208.67.220.220,2620:119:35::35]:
Enter a comma-separated list of search domains or 'none' []:
If your networking information has changed, you will need to reconnect.
For HTTP Proxy configuration, run 'configure network http-proxy'

Manage the device locally? (yes/no) [yes]: yes
Configuring firewall mode to routed


Update policy deployment information
    - add device configuration
Successfully performed firstboot initial configuration steps for Firepower Device Manager for Firepower Threat Defense.
Initial Wizard Setup (FDM Web) Configuring Outside IP address, Time, License and Management Option.
Configure the outside IP address

Configure your time zone and NTP (Do make sure you configure the same NTP if you are configuring HA)

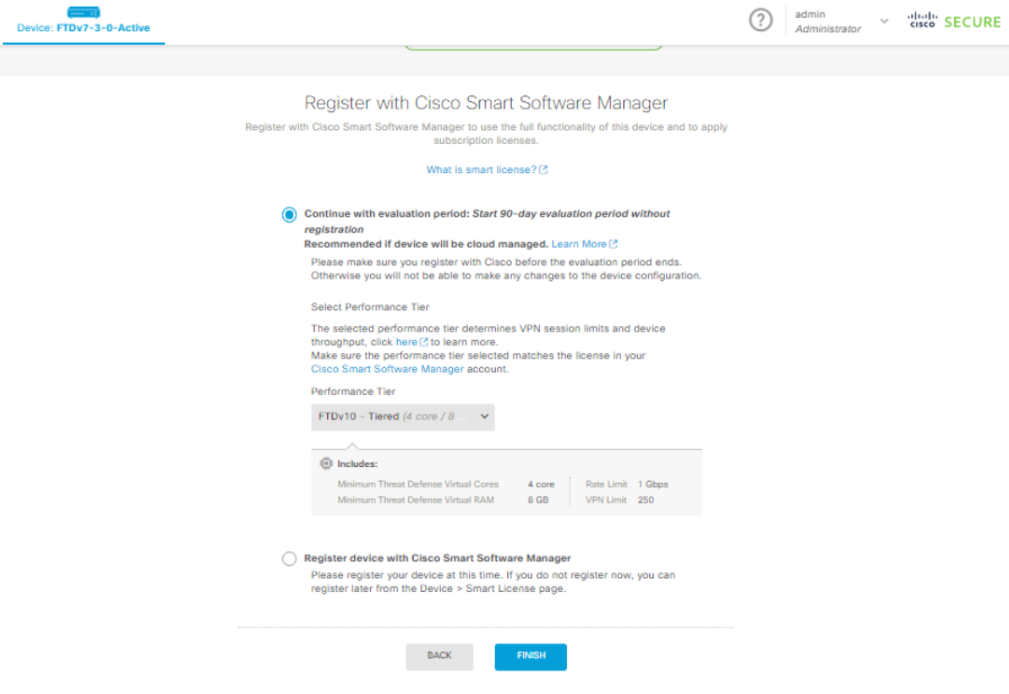
Register your smart license. If you are starting a trial select the Performance Tier for FTDv.
Select the mode of management whether you are managing this using the local FDM or using CDO/Cloud FMC to manage the FTDv from the cloud.
Some useful commands to monitor and troubleshoot HA
show failover
show failover history [details]
show failover statistics
show failover interface
show monitor-interface
show running-config failover
failover exec { active | standby | mate}
failover reset
configure high-availability suspend
configure high-availability resume
Below is the official guide to on configuring HA with the 7.3 Software version which includes the troubleshooting steps and explanation.
Virtual Local Mac Address
To configure your own virtual local mac address, these are the sets of locally administered address ranges, replacing x with any hex value. You might want to check the list of assigned mac address to see if there are any changes that might cause conflicts.
https://standards-oui.ieee.org/oui/oui.txt
x2-xx-xx-xx-xx-xx
x6-xx-xx-xx-xx-xx
xA-xx-xx-xx-xx-xx
xE-xx-xx-xx-xx-xx