Remote Access Virtual Private Network (RA VPN) allows remote office / remote worker to connect back to the Head Office to gain access to resources that are not accessible from the public internet directly. Even thou more and more application are accessible from the public internet directly due to the wide adoption of Cloud Services, for larger organization there are still application such as critical information and databases are open to the public internet directly to reduce the risk of cyber attacks.
In this tutorial, I will show you how you can quickly configure RA VPN using the on device Firewall Device Manager to configure a Cisco Secure Firewall (Firewall Threat Defense Virtual (FTDv) to allow remote access VPN to access the resources behind the Firewall.
Below is how the setup looks like.

Configuring Remote Access VPN
There are many advance features that you can configure for the Cisco Secure Firewall. However in this tutorial I will only show you the essential configuration to setup Remote Access VPN to allow access to a single LAN behind the firewall.
To enable remote access VPN for your clients, you need to configure a number of separate items. The following procedure provides the end to end process. Below are the extracts of the step from the Cisco Documentation.
Procedure
| Step 1 | Ensure you have the necessary licenses. |
| Step 2 | Identity source we will be using the local identity store for this. We will create a demo user for this tutorial. |
| Step 3 | Configuring a new Remote Access VPN Connection Profile. We will use the default certificate for the initial tutorial and at the end of the tutorial I will show you how to use Let’s Encrypt Wildcard Certificate. |
| Step 4 | We will make use of the default policy and make basic changes to the default policy. |
| Step 5 | Access Policy, we will configure the Access Policy to allow – Access to the Local Network – Hair-pinning. Allowing traffic from the Remote Client to Access the internet through the outside interface of the FTDv. This is the recommended most secure method. However do note that the performance might be impacted versus direct internet access (DIA). You can look at Umbrella SIG for DIA for remote and branch office for better performance without compromising security. |
| Step 6 | Basic troubleshooting |
Step 1 – Ensure you have the necessary licenses.
Go to Device and under Smart License click on View Configuration.

You must have the base license and the RA-VPN license enabled to perform this configuration. The trial license does not allow you to configure the RA VPN.

Step 2 – Using the local identity store and creating a demo user.
Under Objects > Users click on the + button.

Create a user and you will see that by default the user has Service Types RA-VPN.

Step 3 – Configuring a new Remote Access VPN Connection Profile.
Under Device > Remote Access VPN click on configure.

Click on CREATE CONNECTION PROFILE.

- Enter Connection Profile Name: DemoRAVPN
- Select the Primary Identity Store
- Authentication Type: AAA Only (You will need external identity store such as Radius to configure additional attributes.)
- Primary Identity Source for User Authentication: LocalIdentitySource
- Client Address Pool Assignment (You can use DHCP or just create a Address Pool
- IPv4 Address Pool: Create a new address pool

You can create a new Group Policy or use the Default Group Policy. We will use the Default Group Policy for this tutorial
For the Global Setting we will use the DefaultInternalCertificate. Do note that if you have not trust the Certificate on your client machine you will get a warning. I will show you how you can use the Let’s Encrypt Certificate. (But note that you will need to manually renew the certificate every 90 days) You can setup a internal root CA and have the client trust the root CA to remove the warning. We will not be covering that in this tutorial.
- Certificate of Device Identity: DefaultInternalCertificate
- Outside Interface: outside (GigabitEthernet0/0)
- FQDN: <Give a FQDN that resolve to the ip address of the public ip address of your FTDv>
- Port: 443 (Default port is 443 you can change this port if 443 is already in use)
- NAT Exempt Enable
- Inside Interfaces: inside (GigabitEthernet0/1)
- Inside Network: <Select the ip address range of your inside network> You might need to create one if you have not already done so or if you want a more granular range then the default private ip. I am using 172.16.x.x so I am choosing that for this tutorial
- Secure Client Package: You will need to upload at least one package to continue. Will recommend you upload all 3 packages for Windows, Mac and Linux.

Review the Summary and if click Finish when done.

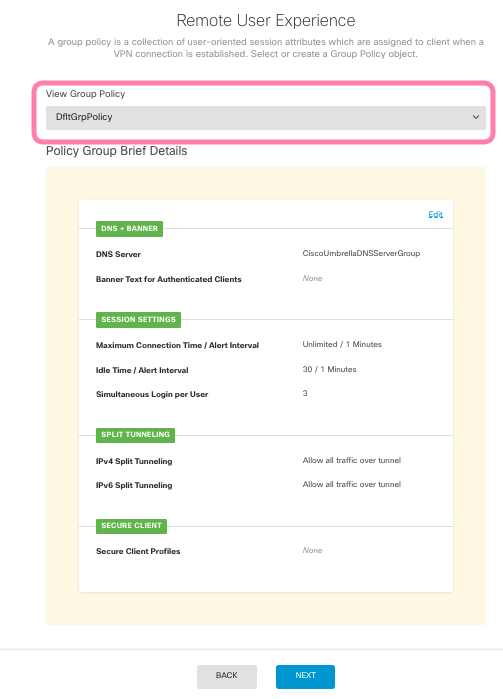
Step 4 – Group Polices for the RA VPN Connection Profiles
Go to Group Policies under RA VPN and Click on edit icon.

If you are routing all traffic through the RA VPN you might want to use the Umbrella DNS Server Group or specific your DNS Server Group.

For this tutorial I am sending all traffic to the RA VPN. Now depending on whether you are using DNS Security such as Umbrella you might not want to send the DNS requests over the tunnel and instead use the DNS of the LAN. But for this tutorial since I am not using Umbrella DNS I am going to send all traffic including the DNS requests over the VPN.

You can review the rest of the setting and check the documentation to see if you need other features such as DTLS which we will not cover in this tutorial.
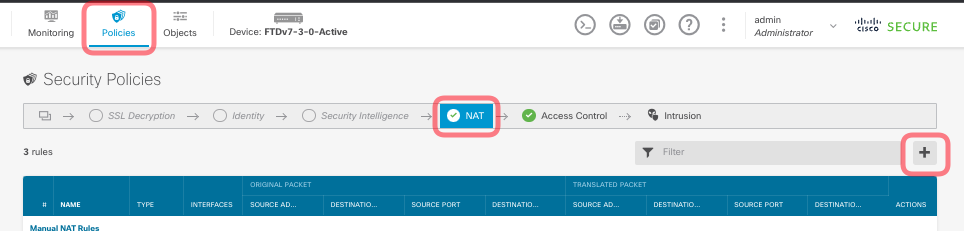
Step 5 – Configure the Access Policies for the RA VPN
Once you finish the above steps you can connect to the RA VPN. However you will not be able to access any of the network since we have not done any configuration in the Access Policies to allow the VPN traffic to access the internal LAN or internet. Unless you are using bypass access control mode which have other constraints and risk. For this tutorial we will be using the Access Policy to Control the Access.
Go to Policies > Access Control and click on the add + button.

- You want to allow the Remote VPN Client to Access the Network by creating an allow policies to the inside/internal network.

- To provide Internet Access on the Outside Interface for Remote Access VPN Client (Hair Pinning).
You can either modify the existing Dynamic NAT rule or create a new one. We will create a new one for this tutorial.

- You will also need to modify the default Access Control Rule for inside to outside access or create a new one.

Step 6 – Basic troubleshooting
Troubleshooting Remote Access VPNs
Remote access VPN connection issues can originate in the client or in the threat defense device configuration. The following topics cover the main troubleshooting problems you might encounter.
Troubleshooting SSL Connection Problems
If the user cannot make the initial, non-Secure Client, SSL connection to the outside IP address to download the Secure Client, do the following:
- If you configured a non-default port for the remote access VPN connection profile, ensure the user is including the port number in the URL. For example: https://ravpn.example.com:4443
- From the client workstation, verify that you can ping the IP address of the outside interface. If you cannot, determine why there is no route from the user’s workstation to the address.
- From the client workstation, verify that you can ping the fully-qualified domain name (FQDN) of the outside interface, the one defined in the remote access (RA) VPN connection profile. If you can ping the IP address but not the FQDN, then you need to update the DNS servers used by the client and RA VPN connection profile to add the FQDN-to-IP-address mapping.
- Verify that the user is accepting the certificate presented by the outside interface. The user should accept it permanently.
- Examine the RA VPN connection configuration and verify that you selected the correct outside interface. A common mistake is to select an inside interface, the one facing the internal networks, rather than the outside interface, which faces the RA VPN users.
- If SSL encryption is properly configured, use an external sniffer to verify whether the TCP three-way handshake is successful.
Troubleshooting Secure Client Download and Installation Problems
If the user can make an SSL connection to the outside interface, but cannot download and install the Secure Client package, consider the following:
- Ensure that you uploaded an Secure Client package for the client’s operating system. For example, if the user’s workstation runs Linux, but you did not upload a Linux Secure Client image, there is no package that can be installed.
- For Windows clients, the user must have Administrator rights to install software.
- For Windows clients, the workstation must enable ActiveX or install Java JRE 1.5 or higher, with JRE 7 recommended.
- For Safari browsers, Java must be enabled.
- Try different browsers, one might fail where another succeeds.
Troubleshooting Secure Client Connection Problems
If the user was able to connect to the outside interface, download, and install the Secure Client, but could not then complete a connection using Secure Client, consider the following:
- If authentication fails, verify that the user is entering the correct username and password, and that the username is defined correctly in the authentication server. The authentication server must also be available through one of the data interfaces.
 NoteIf the authentication server is on an external network, you need to configure a site-to-site VPN connection to the external network, and include the remote access VPN interface address within the VPN. For details, see How to Use a Directory Server on an Outside Network with Remote Access VPN.
 - If you configured a fully-qualified domain name (FQDN) for the outside interface in the remote access (RA) VPN connection profile, verify that you can ping the FQDN from the client device. If you can ping the IP address but not the FQDN, then you need to update the DNS servers used by the client and RA VPN connection profile to add the FQDN-to-IP-address mapping. If you are using the default Secure Client profile that is generated when you specify an FQDN for the outside interface, the user will need to edit the server address to use the IP address until DNS is updated.
- Verify that the user is accepting the certificate presented by the outside interface. The user should accept it permanently.
- If the user’s Secure Client includes multiple connection profiles, that they are selecting the right one.
- If everything seems right on the client end, make an SSH connection to the threat defense device, and enter the debug webvpn command. Examine the messages issued during a connection attempt.
Troubleshooting RA VPN Traffic Flow Problems
If the user can make a secure remote access (RA) VPN connection, but cannot send and receive traffic, do the following:
- Have the client disconnect, then reconnect. Sometimes this eliminates the problem.
- In the Secure Client, check the traffic statistics to determine whether both the sent and received counters are increasing. If the received packet count stays at zero, the threat defense device is not returning any traffic. There is likely a problem in the threat defense configuration. Common problems include the following:
- Access rules are blocking traffic. Check the access control policy for rules that prevent traffic between the inside networks and the RA VPN address pool. You might need to create an explicit Allow rule if your default action is to block traffic.
- The VPN filter is blocking traffic. Check the ACL traffic filter or VLAN filter configured in the group policy for the connection profile. You might need to make adjustments in the ACL or change the VLAN, depending on how (or if) you are filtering traffic based on group policy.
- NAT rules are not being bypassed for the RA VPN traffic. Ensure that NAT exempt is configured for the RA VPN connection for every inside interface. Alternatively, ensure that the NAT rules do not prevent communication between the inside networks and interfaces and the RA VPN address pool and outside interface.
- Routes are misconfigured. Ensure that all defined routes are valid and functioning correctly. For example, if you have a static IP address defined for the outside interface, ensure that the routing table includes a default route (for 0.0.0.0/0 and ::/0).
- Ensure that the DNS server and domain name configured for the RA VPN are correct, and that the client system is using the correct ones. Verify that the DNS servers are reachable.
- If you enable split tunneling in the RA VPN, check whether traffic to the specified inside networks is going through the tunnel, while all other traffic is bypassing the tunnel (so that the threat defense device does not see it).
- Make an SSH connection to the threat defense device and verify that traffic is being sent and received for the remote access VPN. Use the following commands.
- show webvpn anyconnect
- show vpn-sessiondb
You can find the Official Cisco Documentation in the following link.